
You've just removed the part from the build plate. You turn it over in your hands and it's perfect. Then you hold it under the light and you see them: the layer lines, one after another, like the steps of a staircase. The temptation is to grab the sandpaper and spend the next two hours sanding. But there's a faster way: adding material instead of removing it.
In this guide we look at how to smooth 3D prints without sanding with 3DBooster Filler, the white spray filler primer Made in Italy: an 8-step procedure, drying times, mistakes to avoid, the real limits of the method and a professional finish. All with one concrete goal: to get you from print to paint with less dust, less time and a more repeatable result.
Quick answer: clean and degrease the part, mask threads and mating surfaces, apply 3DBooster Filler in two thin, cross-hatched coats at 20-30 cm, leave to dry for at least 24 hours and paint. The filler fills the valleys between layers and evens out the surface. It does not correct warping, layer shift or structural defects.
In this guide:
- Why layer lines are visible (and why paint highlights them)
- Sanding vs filler primer: time, dust and costs
- How 3DBooster Filler works
- How to smooth 3D prints without sanding: 8 steps
- The 3-specimen test: raw, paint only, Filler
- The mistakes that ruin the finish
- When filler is not the right choice
- Frequently asked questions
Why layer lines are visible (and why paint highlights them)
FDM printing deposits filament in layers. Each layer leaves a stepped profile: the layer height, typically between 0.1 and 0.3 mm, determines the distance from one ridge to the next. On a flat surface the effect is barely noticeable; on a curve, an engraving or an angled detail it becomes obvious. You can feel it by touch, you can see it under the light.
Paint, especially if glossy, acts like a magnifying glass: it doesn't fill the lines, it follows them. That's why a painted part without preparation can look even more “3D printed” than one left raw. The gloss highlights the topography of the surface and makes every step more visible.
You have two options:
- Removing material: sand the ridges with progressively finer abrasive papers. It works, but it takes time, creates dust and can round off edges and details.
- Add material: fill the valleys between the layers with a filling primer. This is the logic of 3DBooster Filler.
Slicing settings can reduce the lines: lower layer height, variable layer height, part orientation, optimised speed and temperature. They do not eliminate them entirely, especially on curved surfaces. The filler comes in afterwards, where the slicer cannot reach.
Sanding vs filler primer: time, dust and costs
Sanding is not just "going over it with sandpaper". It is a sequence: coarse grit, medium grit, cleaning, primer, optional filler, finishing sanding, final cleaning. Each step consumes time, abrasives and attention. And every part is slightly different from the previous one.
| Criterion | Traditional sanding | 3DBooster Filler |
|---|---|---|
| Active time | 30-60 minutes per average part | 10-15 minutes per part |
| Dust | Yes, with mask and extraction | No |
| Fine details | Risk of rounding off edges and lettering | Fills without abrasion |
| Repeatability | Depends on the operator's hand | High, if the process is repeated |
| Cost | Labour + abrasives + cleaning | Product + application time |
| Drying | Minimum grit | At least 24 hours, passive |
Let's take a concrete example. A part that requires 45 minutes of manual sanding, at €25/h labour, costs around €19 just for sanding. With the filler, application drops to 10-15 minutes; the rest is passive waiting, during which you can print other things or prepare other parts. On a small batch of 20 parts, the difference becomes obvious: 15 hours of sanding versus 3-5 hours of active application.
The saving isn't in the can: it's in labour time and repeatability. Of course, the calculation holds if the filler really covers the lines on your part. On very high layers or complex geometries, more coats or local touch-ups may be needed: the advantage remains, but it must be measured on your specific case.
How 3DBooster Filler works
3DBooster Filler is a white spray filler primer, formulated for FDM 3D printing and also suitable for use on SLS and resin prints. It is manufactured in Italy in a 400 ml format. Its function is to build a covering layer that fills the valleys between layers, evens out the surface and prepares the part for painting. In practice, it is the most direct way to smooth 3D prints without sanding when the problem is layer lines.
It's not a paint and it's not a simple adhesion primer. A traditional primer prepares the surface and covers; a high-build filling primer adds material where needed. Nor is it acetone or chemical smoothing: the filler doesn't dissolve the plastic, it coats it. It's a change of perspective: instead of wearing down the peaks, you fill the valleys.
Technical data sheet
| Item | Detail |
|---|---|
| Code | F.S.FLR.400W |
| Format | 400 ml |
| Colour | Opaque white |
| Type | Spray filler primer (aerosol) |
| Compatibility | FDM, SLS and resin 3D printing |
| Application distance | 20-30 cm |
| Application | 2 cross coats |
| Drying | At least 24 hours |
| Painting | After complete drying, with a preliminary test |
| Premium finish | 1-2 coats of 3DBooster UV-Shield |
| Made in Italy | Yes |
👉 Discover 3DBooster Filler on the official shop: 3DBooster Filler, 400 ml spray filler primer.
What you need to get started
- 3DBooster Filler in a 400 ml aerosol can;
- 3DBooster Fineclean to clean and degrease the surface;
- nitrile gloves, safety goggles and a face mask;
- masking tape and plugs for holes and threads;
- a scrap piece to test the paint on;
- a covered work surface and a ventilated area.
⚠️ Safety: 3DBooster Filler is an extremely flammable aerosol. Use it in a ventilated area, away from flames, sparks and hot surfaces. Wear gloves and eye and face protection. Do not pierce or burn the can, do not expose it to temperatures above 50 °C and keep it out of the reach of children. Always follow the warnings on the packaging.
Time: 15-20 minutes of active work, plus at least 24 hours of drying.
How to smooth 3D prints without sanding: 8 steps
1. Prepare and check the part
Remove supports, brim, raft and stringing. Blow away the dust with compressed air or a clean cloth. Check that there is no warping, layer shift, under-extrusion or cracking: the filler is a cosmetic corrector, not a structural repairer. If the defect is deep, fix the print first.
2. Clean and degrease
Oils, hand residue and contaminants prevent adhesion. Wipe 3DBooster Fineclean onto a clean, dry surface, then let it evaporate. Do not touch the part with bare hands after degreasing.
3. Mask the critical areas
The filler adds thickness. Cover threads, holes, bearing seats, snap fits and mating surfaces that must not change dimension. If you are unsure about a tolerance, mask it: it is easier to uncover an untreated area than to redo a fit that is too tight.
4. Shake and test the can
Shake the can well until you hear the ball moving continuously. Do a test on a scrap piece: check the spray, the distance and the coverage. A product that has not been shaken applies an uneven mixture, with fillers separated from the resin.
5. Apply two cross coats
Keep the can 20-30 cm from the part. Apply two thin, cross coats, starting and finishing the spray outside the part. Rotate the model and cover the less visible areas too, without stopping on the same spot. Two light coats are better than one wet coat: runs are difficult to correct and build-ups hide details.
6. Dry for at least 24 hours and inspect
Leave to dry at room temperature, away from sunlight, for at least 24 hours. The time may vary with humidity, temperature and coat thickness. If deep lines remain after 24 hours, apply another thin coat and wait a further 24 hours. Do not sand to compensate: you risk damaging the film just created.
7. Paint
After complete drying, the part is ready for painting. Always test the paint on a scrap piece to check adhesion and compatibility. Generally one coat is sufficient; follow the paint manufacturer's instructions for times and methods.
8. Protect with UV-Shield
For a premium finish, once the paint is dry apply 1-2 coats of 3DBooster UV-Shield at 20-30 cm. The anti-UV acrylic clear coat gives gloss, depth and protection from UV rays. The correct order is: Filler → 24 hours → paint → drying → UV-Shield.
The 3-specimen test: raw, paint only, Filler
The clearest comparison is the one you'll find in the image below: three identical test pieces, treated in three different ways. On the left the raw print, in the centre the paint alone, on the right the paint applied after 3DBooster Filler.
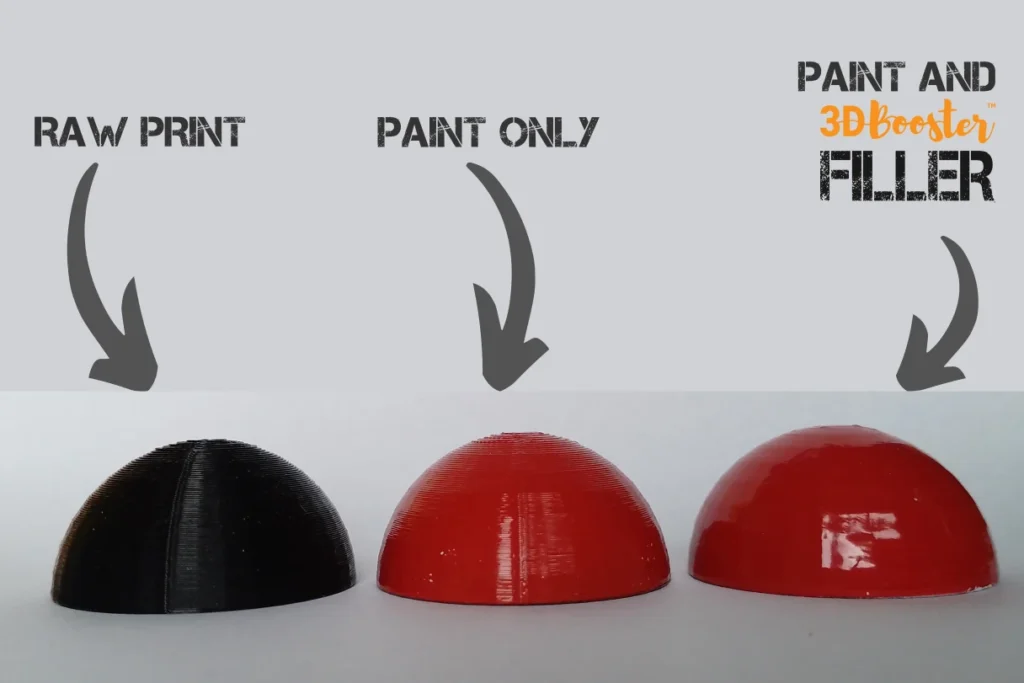
The raw test piece shows the layer lines clearly. The one painted without filler keeps them: the paint is too thin to fill the valleys and, if glossy, highlights them even more. The third test piece, treated with Filler and then painted, has a uniform, reflective surface with no stepped profile.
Be careful to read the result correctly: the filler doesn't magically “disappear”. It builds up a layer. The final quality depends on the starting layer height, the number of coats and the geometry of the part. On 0.1-0.2 mm layers and two thin coats the result is already very clean; on 0.3 mm layers or deep defects an additional coat may be needed.
How to replicate the test at home
- Print three identical pieces with the same layer height and the same parameters.
- Leave the first one raw, paint the second without filler, treat the third with Filler and then paint it.
- Compare the three test pieces under raking light, at the same distance and from the same angle.
It's the most honest way to understand how much the filler improves your workflow, on your materials and with your layer heights. If the test works, you can standardise the process; if it isn't enough, you know you need to adjust your slicing or add another coat.
How much time do you save? A concrete example
| Scenario | 20 pieces: sanding | 20 pieces: Filler |
|---|---|---|
| Active time | 15 hours (45 min/piece) | 3-5 hours (10-15 min/piece) |
| Drying | Between one grit and the next | 24 passive hours per cycle |
| Dust and cleaning | High | None |
| Repeatability | Variable | High |
| Labour cost | Approximately €375 at €25/h | Approximately €75-125 at €25/h |
The figures are indicative: they depend on the size of the part, the complexity, the layer height and the operator's manual skill. The point is not the absolute saving, but the type of work: the filler shifts the waiting from manual work to passivity. You can apply the product and get on with something else while it dries.
The mistakes that ruin the finish
- Coats too thick: runs, pooling and covered details. Two thin coats are better.
- Wrong distance: too close concentrates the spray, too far creates a dry powder that adheres poorly. Stay between 20 and 30 cm.
- Not degreasing: oils and residues prevent adhesion and cause detachment.
- Painting before 24 hours: solvents remain trapped and compromise the finish and adhesion.
- Forgetting to mask: threads and joints change size and the part no longer fits.
- Expecting it to repair structural defects: warping, layer shift and cracks are not solved with a spray.
- Using filler on sensitive materials without testing: TPU and solvent-sensitive plastics may require a preliminary test.
- Spraying in the sun or in high humidity: the film may become cloudy or dry unevenly.
When filler is not the right choice
Filler is a tool, not a universal solution. Do not use it, or use it with extreme caution, when:
- the part has tight mechanical tolerances, threads, gears, bearing seats or snap fits;
- the surface must remain transparent;
- the defect is structural: warping, layer shift, under-extrusion, deep cracks;
- the part is intended for food contact or a medical application: specific materials and certifications are required;
- the material is highly sensitive to solvents or flexible and you have not carried out a preliminary test.
A good post-processing workflow is not “filler everywhere”. It is filler where needed, sanding where needed, and no treatment where the part is already functional.
Filler, UV-Shield or sanding: what to choose
| Solution | Used for | When to use it |
|---|---|---|
| 3DBooster Filler | Filling layer lines and visible defects, creating an opaque white base | Before painting, on aesthetic parts |
| 3DBooster UV-Shield | Glossy clear finish, UV protection, depth | After painting, to seal the job |
| Sanding | Removing ridges, correcting geometries, touching up localised spots | On mechanical defects or where filler cannot reach |
To learn more about the role of clear coat, read the guide on UV-Shield for protecting 3D prints. To see the method applied to a real case, there is the True Iconic Design case study on sanding-free finishing.
Frequently asked questions
Does filler primer really eliminate sanding?
Yes, on layer lines. 3DBooster Filler fills the valleys between layers and creates an even surface, ready for painting. It does not correct warping, layer shift, under-extrusion or structural defects. On very high layers or deep defects, a second coat may be needed after drying.
How many coats are needed and how long must it dry?
Two thin, crossed coats are needed, applied at a distance of 20-30 cm. Full drying takes at least 24 hours at room temperature, away from sunlight. In high humidity or with thick coats, it is better to wait longer before painting.
Which 3D prints can it be used on?
On FDM, SLS and resin prints, applied to a clean, dry surface. On solvent-sensitive or flexible materials such as TPU, always test on a scrap piece before treating the final model.
Can I paint directly over 3DBooster Filler?
Yes, after completely drying for at least 24 hours. Test the paint on a scrap piece to check adhesion and compatibility: usually one coat is enough. For a premium finish, apply 1-2 coats of 3DBooster UV-Shield when the paint is dry.
Is 3DBooster Filler or UV-Shield better for smoothing?
They are complementary. 3DBooster Filler is the high-build filling primer for layer lines and obvious defects. UV-Shield is the anti-UV acrylic clear coat for the final finish: it gives gloss, depth and protection. Filler first, then paint, and finally UV-Shield.
How much thickness does the filler add?
It depends on the number and thickness of the coats. Two thin coats add a noticeable layer: before applying the filler, mask threads, holes, bearing seats and mating surfaces that must not change dimension.
Conclusion: from printing to painting, without sanding
Layer lines are not a defect that must be erased with abrasive paper. They are a topography problem: they can be filled. 3DBooster Filler builds a controlled layer that evens out the surface, reduces dust and makes the finish more repeatable. It is not a magic shortcut, but a method with precise rules: two thin coats, 24 hours of drying, masking of critical areas and testing the paint.
If your goal is to smooth 3D prints without sanding on aesthetic parts, this is the starting point. If the problem is layer lines on a part to be painted, it is one of the smartest solutions to save time without sacrificing detail.
For the complete flow: Fineclean to clean and degrease, Filler to fill, UV-Shield for the glossy, anti-UV finish.